
In this tutorial I am going to show you how I draw a cunning and alert fox with soft pastels, charcoal, Conté crayons and pastel pencils. I want to share with you how I work on the whole piece, building up darks and lights to create the form, and then continue to refine this initial drawing and gradually work into areas of detail.
At each stage I stand back (or sit at the other side of the room with a cup of coffee) and assess how the piece is going, so I can constantly tweak it as I go along. I like to think that this results in a unified and balanced piece of work. We can create many different textures by varying our materials, from very soft Unison pastels, to hard Conté crayons and pastel pencils.
- Mount card
- Art Spectrum Colourfix primers, colours White, Burgundy and Raw Sienna
- 2” decorator’s brush
- Unison pastels – range of blues, warm browns and oranges
- Pencil eraser
- Conté crayons
- Charcoal
- Faber-Castell Polychromos cream pastel
- Faber-Castell Pitt Pastel Pencils
- Scalpel for sharpening pencils
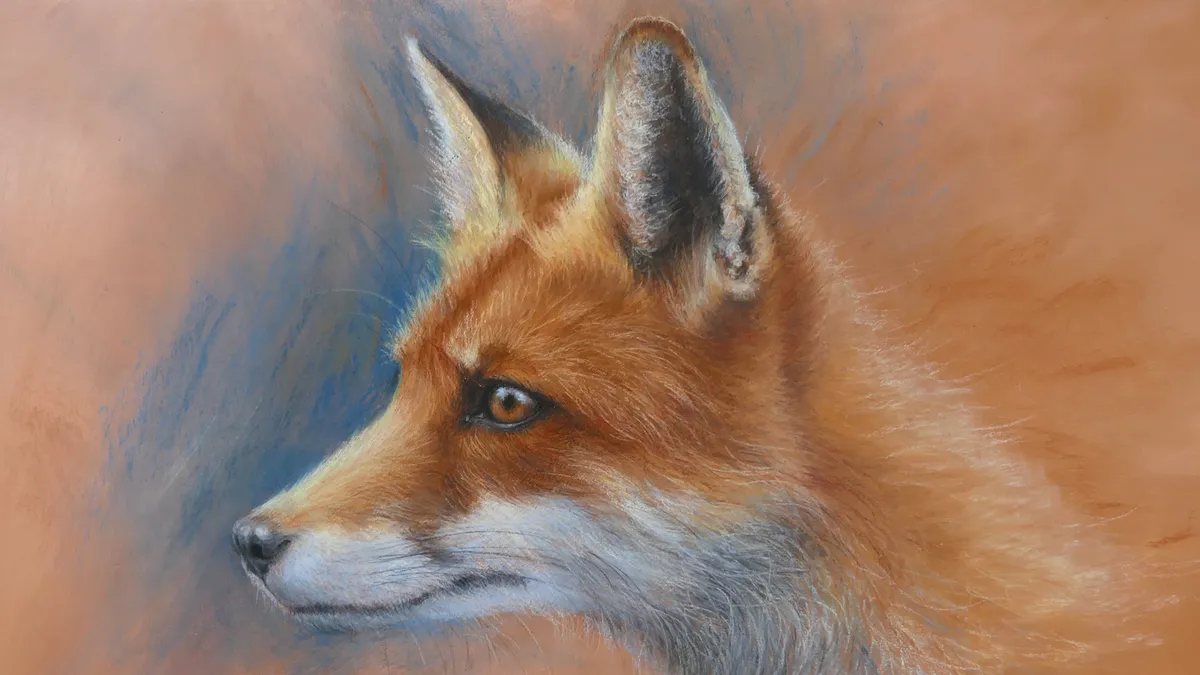
For my reference I am using a copyright-free photograph by Jiri Sifalda from the Unsplash website. I was inspired by the rich colours, and the way it captures a moment when the fox looks alert, and I want to get that feeling into my painting. I also love the variety of textures in the fur, and the cunning gleam in the eye. I decided to focus on the head so I could really enjoy the textural qualities of the fur.
I am working on mount card that I have primed with Art Spectrum Colourfix primers, but you could easily do this project on pastel paper if you don’t have primers. It is a good idea before starting any project or how to draw tutorial to have a play with your materials, trying out marks and textures for yourself on a spare piece of paper, and varying the pressure that you apply. Try flicking, smudging and using the side or end of the pastel in turn.
1. Prime the surface

I like to work on Art Spectrum Colourfix Primer, which I paint onto mount card with a 2” decorator’s brush. This gives me a surface with two or three colours combining to create a lively surface, but again, you could easily create this artwork on pastel paper or other pastel surfaces. Here I’ve used White, Burgundy and Raw Sienna, and made the brush strokes follow the direction of the fox’s coat. These warm browns combine to make a really ‘foxy’ colour, but if you’re using paper, I’d choose a warm brown.
2. Create charcoal sketch

I loosely sketch the fox in with charcoal. The charcoal is a soft grey, which is similar to the colour of animal’s skin, so is ideal as an initial sketch. I always try to understand what it is about an image that conveys the character of the animal, and what the story is that I am telling in this picture. Here it was the intensity of that eye that really mattered, so as I draw I think about how I am going to show that. I am also looking for dark areas, as they describe the form.
3. Create underdrawing

I really love using Conté crayons for my first layer of drawing animals, as they contain less pigment than soft pastels. Because of this, they can be easily erased and smudged out if I haven’t put them in quite the right place. It’s a bit like a first colour sketch. These two colours, similar to Burnt Sienna and Raw Sienna, are a great base for the fox’s fur. The underpainting will show through and blend with the pastel colours I lay over it.
4. Add darks

Now I have the rich sienna colours put in, I can work into those darks a bit more, using charcoal and a black Conté crayon for emphasis. This is slightly harder than the other Conté crayons, and makes quite a permanent mark, which is why I used the more forgiving charcoal to start with. I love the sharp edges I get with a broken black Conté crayon – they are great for details such as eyes and noses.
5. Colour in the eye

I build the colour of the eye with a mixture of Unison pastels, in warm browns and a natural earth colour. I still use the Raw Sienna Conté crayon for its lovely golden glow. I add the colours with the end of the pastels and rub them slightly with my little finger to blend. I can then put the dark of the pupil in again in black. You have to be patient here as the layers of colour give depth, and you can use the lights and darks to create the shadows of the spherical eyeball.
6. Add richer red/brown

Now it’s time to enrich the warm colours of the coat with Unison soft pastels. Their pure pigment creates enormous depth of colour. Having made the eye more intense in the previous stage, I need to do the same with the coat to achieve balance. I’m working on this area first as it is the focal point of the picture, and needs to be dramatic. I can work more loosely as I move away from it.
7. Create a glint in the eye

The shine of the eye is in direct contrast to the soft textures of the coat. The way to achieve shine is to have a strong tonal contrast. Much of the tone on the fur changes gradually, but with this eye, I need bright lights to jump out against the darker darks. I use a light blue soft pastel, and press quite hard with the end of it to create some bright marks, looking very carefully at the reference photo to get these marks in the right place.
8. Add fine hairs

Now in order to blend the short fur around the eye into the rest of the fur, I use my Raw Sienna Conté crayon, making little short marks, using the sharp end. These work really well over the darker soft pastel colours already there.
In places I soften the soft pastel under-layers so these new, sharper marks really show. I use this technique quite often in this piece, always paying very careful attention to the direction of the hairs.
9. Make the background

As the fox is a warm and vibrant red/brown, I use muted blues for the background. I want the background to make the colours of the fox jump forward, so I use a contrasting colour, and make the background darker against the light areas of the fox’s head. I only put the blue around the areas
I want to accentuate, and in order to make the fox look more vibrant, I use an eraser to soften and ‘knock back’ the blue. Rubbing and softening with my fingers, and also using an eraser, flattens and deadens the intensity of the pastels.
10. Focus on light areas

I use two cream pastels: a creamy yellow Unison pastel and a Faber-Castell Polychromos one, which is harder, with which to base in the lighter areas of the fox’s coat. The Polychromos pastel is good for a sketchy base, but I soften the Unison cream in to get a lovely soft surface to work over with pastel pencil later. I also put these lighter tones into the ears.
11. Refine the coat and ears

Now I have based in most of the fox, I want to soften, sculpt and refine
my piece, using lightly hatched pastel pencils, a little charcoal and soft pastel, to create subtleties of tonal changes and depth. This can be a careful part of the process, but remember that you don’t need to put detail in everywhere. Try to create points of interest with detail, and soften away from them with
a light touch. To do this, I am constantly looking at my reference to understand exactly where to put my lights, medium and darks.
12. Add light blue around the mouth

In order to paint in the soft, shorter-haired white of the fox’s mouth area and lower jaw, I use a soft light blue. This is the same colour I used for the shine in the eye. I do not want to use white, as it will ‘jump’ out of the picture too much, so a light blue is a good starting point. I soften it on, paying attention to the direction of the fur, and then use a dark brown pastel pencil to gently draw in the curved line of the mouth.
13. Make subtle tonal changes

Over this light blue, I blend areas to get subtle shadows, using charcoal, Conté crayons and pastel pencils in soft greys and creams. You can draw attention to places where the colour of the coat changes, and light hairs lie over dark hairs, or vice versa. I integrate the colours using lightly hatched hair-like marks, and also blend some of the reds and browns in the white and grey areas to give the piece a unified feel.
14. Create long neck hairs

I love the textures of the longer, wiry hair on the neck. To create this I put on flicked marks with a lilac grey Unison pastel, charcoal and the cream/white Polychromos pastel that I used earlier. The Unison pastel can be smudged and softened with your fingers, and then the charcoal followed by the cream flicked over the top and left unsmudged. This develops depth and variety of texture.
15. Refine the nose and mouth

Using sharp grey and black pastel pencils, I refine the nose area and keep developing the subtle changes around the muzzle area. This then blends into the neck. Using flicks and very light smudges of many of the lighter colours already used, I soften the different neck areas into each other. I try to keep a light touch, as I do not want this area to dominate, but just to be hinted at.
16. Make whiskers

Pastel pencils are great for whiskers, but look very carefully before you draw them in, at where they grow from, which direction they go in, and how fine they are. Then it’s great to have a practice on a spare piece of paper at the light flicking movement – you need to make sure that they are thicker at the base than the end.
This tutorial is also published in Paint & Draw: Animals. Go to Magazines Direct to buy the full bookazine.


